

It’s time to cut the baseboards for your new or renovated house, but how would you exactly do that?
Well, you don’t need to worry about that because this detailed guide will help you safely cut your baseboards and trim like a pro.
Remember to read this guide thoroughly, we have added some tips and tricks for your benefit.
Quick Summary
In this complete guide, we will go over the following:
- Tools required
- Baseboard joints
- Safety precautions
- Step by step guide to cut baseboards with a miter saw
- Installation of baseboard
- Final verdict
Tools Required
Here’s a list of tools you’ll need:
- Pencil
- A miter saw
- Miter box
- Baseboards molding
- Measuring tape
- Safety glasses
- Nail gun
- Finish nails
- Sandpaper
- Square or protractor
- Stud finder
Which Power Tool Should You Use? - In-Depth Guide
You must select a power tool that gives you quality cuts and has multiple features to deal with your baseboard molding.
A bad choice might ruin your molding or can break it so, it’s better to select wisely.
We think that a compound miter saw is a perfect tool to cut baseboard. This is mainly because it allows you to have clean and sharp cuts and has various features that come in handy while cutting.
It is probably the best choice among power tools for baseboard molding, especially when it comes to cutting baseboard corners.
Moreover, this miter saw has an extended table that provides a good space to cut the baseboards.
Types of Baseboard Corners
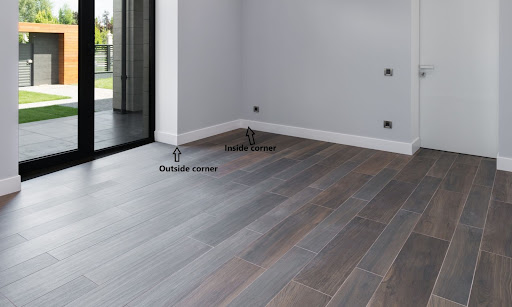
Before you cut your baseboard, you must understand a bit about the corners of the walls. Hence, there are two kinds of baseboard corners you must consider while you cut baseboards for your walls.
Outside Corner
This is a corner of the wall that projects outwards in the space. It is an L-shaped joint, usually of a 90-degree angle.
To create an outside corner with baseboards you need a power tool such as a miter saw. However, in the following sections, we have explained how you can create one.
Inside Corner
It is a corner where two walls meet. For four walls, you need to make four inside corners. To create one you need to set up the bevel of your miter saw at a 45-degree angle and the miter to 0 degrees.
However, read this guide further to learn the in-depth process of making inside corners. After some practice, you’ll be able to do it effortlessly.
Safety Precautions
Remember folks, don’t learn safety by accidents. It’s really important to ensure safety precautions, especially when you have to work with power devices like miter saws.
This is mainly because miter saws consist of a sharp blade and a high-speed motor.
Following are the safety measures you should consider:
- Before you use the saw, read the manual.
- Wear safety gloves to prevent cutting your fingers or hands with the saw blade.
- Make sure your saw is unplugged until you need it.
- Don’t touch the blade.
- For noise cancellation, always wear earplugs.
- For protection against wood particles, we recommend wearing safety glasses.
Looking for more resource guides? We’ve got them right HERE.
Step-by-Step Guide to Cut Baseboards With a Compound Miter Saw
Step 1: Take Measurements
First things first. Before you begin to cut your baseboards, you must take measurements.
Use a measuring tape and make sure to measure all the edges of your room because this will help you get an idea of the inside and outside corners of the room.
Make sure you record your readings on paper and collect the measurements of all inside and outside corners on it. It is really important that you make accurate readings. It’s an old saying “measure twice, cut once”, so be sure to double-check the measurements.
Measure the length of the wall from one corner to the other with tape. This will tell you how long the baseboards need to be.
Step 2: Mark the baseboard
Once you have taken the measurements, mark the baseboard with the pencil where you need to cut. The carpentry mainly depends on measurements, if they’re faulty it eventually wastes your time and product both.
Pro Tip: Always leave a little extra material as you can cut more, but you cannot put it back.
Step 3: Make cross cuts
In this step, you just have to roughly orient the baseboards and trim pieces.
- Set a miter and bevel at 90 degrees on the saw.
- Take a baseboard and place it up on the wall where it will be installed.
- Then, make a mark with a pencil on the piece of trim. This will ensure the size of each piece of baseboard required for a wall.
- Use a compound miter saw or miter box to simply crosscut the baseboard.
If you practice a little, you’ll be able to do it quite easily.
Pro Tip: It’s not necessary to have an accurate angle. This step is done to get a vague idea of directions.
Step 4: Make Butt Joint
This step is necessary when you have to make straight cuts. The butt joint is usually made to connect the molding of a wall to any obstruction, for example, a door.
- Set the miter and bevel to 90 degrees.
- Make sure the workpiece is measured and marked.
- Then, use a miter saw to cut the baseboard straight.
- Test fit the joint.
Step 5: Make a Scarf Joint
If you have to join two pieces of baseboard for a longer wall, you should make a scarf joint. It is quite simple to make this joint if you follow the instructions accurately.
- Take two 90 degree end pieces of baseboard molding that you want to join.
- Position the pieces and mark both pieces with the 45-degree angle cut.
- Then, use a compound miter saw or miter box to cut both pieces at a 45-degree angle.
- Sand the edges of the trim to smoothen the ends.
- Fit your joint to see if it fits properly.
Step 6: Cut an Inside Corner
The inside corner of the baseboard is made where two walls meet. For that, you need to make a coped joint instead of a butt joint. This is mainly to avoid unwanted gaps in a baseboard corner.
Following is the easiest way to cut baseboard to make an inside corner:
- Butt a one piece of baseboard with a miter saw.
- Test fit it to check if it’s a 90-degree angle.
- Next, take the second baseboard and position it faces down on the floor.
- Use a scrap piece of baseboard and hold it perpendicularly to the face-down board and line its profile with a pencil. This will serve as a reference point for a coped joint.
- With your compound miter saw, set the miter angle at 0 degrees and the bevel angle at 45 degrees.
- Place the marked baseboard down-faced on the fence of the saw. Turn on the miter saw.
- Cut the baseboard to make a back bevel cut that is a little less than 90 degrees angle, around 1/16 inch would be fine.
- Take off your saw blade that remains with your triangular and half-round file trim. Test fit to make sure it fits correctly.
Step 7: Cut an Outside Corners
Miter joints are used for the outside corners of the wall. In this step, you’ll learn how to make a miter joint.
- Grab two pieces of baseboard molding. The first piece should extend past the outside corner.
- Use the square tool to mark the position where the first piece will meet the other piece of the corner.
- Set the miter at 0 degrees and the bevel at 45 degrees.
- Use a miter saw to cut the piece of trim.
- Repeat the steps for the second piece and use a miter box to cut it.
Install the Baseboards
This is the final step. To install baseboards, it is better to use finish nails and adhesives together because this creates a strong attachment between wood and wall.
However, there are a few precautions you need to consider during installation.
- Test-fit the baseboards where they will be installed to ensure that they fit perfectly.
- Use the right size of nails. This will ensure the stability of the baseboard. You should use a 2-inch nail for fixing up any piece of trim.
- Drill the nail with a nail set or power brad nailer
- For a baseboard corner, you must locate the studs with a stud finder and mark them. Then, use a nail gun to drill the nails.
How to Cut Baseboards with a Miter Saw - Conclusion
That’s all folks. We hope that it is easy for you to understand how to cut the baseboards with a miter saw.
At first, you may find it intimidating to cut baseboard, but once you practice a bit you will become a pro. We recommend reading the article thoroughly to understand it better.
If there’s anything else you would like to know, please post a comment below.
For more information, CLICK HERE.